Actions
A wind-waker app is all about actions.
It's a simple way to figure out how to build your application,
only thinking in the actions you need, wind-waker will do the hard work for you.
All incoming requests will be mapped to the corresponding action.
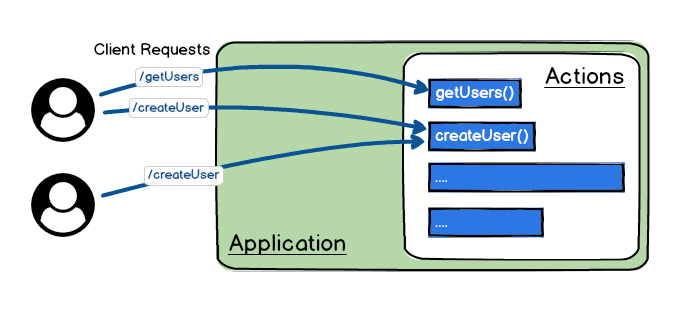
An action is responsible to handle a request and send back a response to client.
Creating an Action#
To define an action you need to create a file using the .action.ts suffix.
For example let's create a hello.action.ts file.
export const hello = (input) => { return `hello ${input.name}!`}Wind Waker will load and publish the hello action.
Visit it on http://localhost:4000/hello?name=World
Notice
- The function's name will be used as the
actionname. - The action function first argument is the querystring name=World convert to javascript object input = {name: "Hello"}
Action Arguments#
The action function can receive 2 arguments:
inputcontext
Input#
The input argument will take the value automatically from the querystring or payload.
You don't need to handle any logic, wind-waker will set the correct value in each case.
Important!
wind-waker discourage the meaning of REST HTTP verbs, to keep the concepts simple.
Each action can be access by using any HTTP verbs.
Example:
export const userList = (input) => { // input will be {limit: 10, page: 1} return input;}Request via get:
curl -X GET http://localhost:4000/userList?limit=10&page=1 Request via post will be the same:
curl -X POST http://localhost:4000/userList?limit=10&page=1 Recomendation
Use in the client side just verbs:
GETfor the queriesPOSTfor the mutation operations
Where the input value comes from?
The querystring will be picked for:
GETDELETE
The payload will be picked for:
POSTPUTPATCH
Context#
The second argument will be the action context defined this way:
interface Context { req: IncomingMessage; // the http request data res: ServerResponse; // the http response data rawBody: string; // content received without any process url: URL; // nodejs URL object for the current request}The context will be used to store useful resources for your applications. For example the logger instance will be injected to context if you use the $logger built-in pipe.
import { $logger } from 'wind-waker';
export const hello = (input, ctx) => {  ctx.log.info(`hello ${input.name}!`);    return `hello ${input.name}!`}
setPipes(hello, [$logger])The $logger Pipe will set log property in the context (ctx) to the logger instance.
Congratulations!
Now you know how to create your actions.
If you want to know more about pipes and define your own pipes go to next section.